



.jpg)
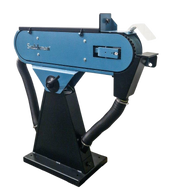


A belt sander removes material fast. That speed is what makes setup and operator technique non-negotiable before metal ever touches the abrasive.How to use a belt sander correctly comes down to three things: selecting the right belt for the job, maintaining controlled feed pressure, and recognizing where operator habits lead to heat buildup, gouged surfaces, and premature belt wear.
Fabricators reach for belt sanders when ironworker-cut parts come off the table with sharp edges, welded assemblies need surface prep before coating, or components require a consistent directional finish. The machine does aggressive work quickly, and aggressive cuts both ways.
What Is a Belt Sander Used For?
What a belt sander is used for in a metal shop covers a specific range of finishing and prep tasks, not the fine woodworking operations most general guides describe.
|
Application |
Description |
|
Deburring |
Removing sharp edges and burrs left after punching, shearing, or sawing. Parts run through an ironworker machine typically need edge cleanup before handling or assembly. |
|
Weld blending |
Knocking down weld crowns and smoothing heat-affected zones before coating or finishing. |
|
Surface conditioning |
Removing mill scale, light oxidation, or inconsistent surface texture before paint or powder coating. |
|
Polishing and buffing |
Achieving a consistent directional finish on stainless or aluminum using a non-woven belt. |
What belt sanders are used for stops well short of precision finishing as a first pass. On thin-gauge material or parts with tight tolerances, a belt sander is the prep tool, not the final tool.
How to Prepare a Belt Sander Before Use
A pre-run inspection takes two minutes and prevents the most common problems. Before starting:
|
Check |
What to Look For |
|
Belt condition |
Tears, fraying, glazed abrasives, or loose splices. A glazed belt generates heat without cutting. |
|
Belt tracking |
The belt should run centered on the contact wheel. On the DBS-3 belt sander, toolless adjustment makes the process fast. |
|
Guards |
Confirm all niping point guards are installed. Per OSHA 29 CFR 1910.243, belt sander safety requires guards at every point where the belt runs onto a pulley. |
|
PPE |
ANSI Z87.1 safety glasses or a face shield are mandatory. Hearing protection is required when noise levels are high for fine metal dust from aluminum or stainless steel. |
|
Workpiece fixture |
Small parts need a clamp or rest. Never hold a small workpiece freehand against a running belt. |
How to Use a Belt Sander Step by Step
The machine runs at a fixed belt speed. The only variables you control are feed rate, pressure, and angle. How to use belt sander correctly means letting the abrasive do the work.
|
Step |
Action |
Why It Matters |
|
Start at full speed |
Power on and wait for the belt to reach operating speed before contact. |
Bringing the workpiece in during acceleration results in an uneven bite and belt damage. |
|
Approach gradually |
Bring the part into contact with the belt in a smooth, controlled motion. |
Hard contact gouges the surface and damages the belt splice. |
|
Use light pressure |
Let the abrasive cut. Do not force the part into the belt. |
Excess pressure generates heat, glazes the belt, and mars the surface finish. |
|
Keep the part moving |
Maintain steady lateral movement. Avoid dwelling in one spot. |
Dwelling concentrates heat and causes uneven material removal. |
|
Check progress often |
Lift the part and inspect regularly. |
Catching an overrun costs seconds. Missing it costs the part. |
On a dual-belt sander with one coarse belt for stock removal and one nonwoven belt for finishing, you move between stages without a setup change. That is the core productivity advantage of a two-belt stationary machine.
.png?width=309&height=512&name=unnamed%20(7).png)
Belt Sander Safety Tips for Metal Shops
Getting the safety basics right before you run the machine keeps the operator and the shop out of trouble. Key points to have in place every session:
- Control spark direction: Position the machine so sparks travel away from flammable materials, swarf piles, and compressed gas storage. Think about this issue during setup, not mid-run.
- Guard every nip point: Confirm all nip point guards are installed and intact before starting. PerOSHA 29 CFR 1910.243, belt sanding machines must be guarded at every point where the belt runs onto a pulley.
- No loose clothing or jewelry: Belt speed on an industrial sander is measured in feet per second. Loose cuffs, dangling jewelry, or untucked rags are entanglement hazards.
- Fixture small workpieces: Parts too small to hold safely with two hands need a clamp or rest. Freehanding small pieces is how operators lose control and unexpectedly come into contact with the belt.
- Separate ferrous and non-ferrous: Aluminum dust mixed with steel sparks is a combustion risk. Clean thoroughly between materials, or dedicate a machine to the task.
Common Belt Sander Mistakes to Avoid
Most problems trace back to three habits: too much pressure, the wrong abrasive grit, and ignored belt tracking.
- Forcing the tool: Pressing hard does not speed up the cut. It speeds up heat buildup, glazes the belt, and leaves discoloration on stainless. Light, consistent pressure is faster and cleaner.
- Wrong grit for the job: Use coarse grits (36–60) for stock removal on ferrous metals, medium grits (80–120) for deburring and blending, and fine grits (150–220) for surface finishing. For aluminum and brass, silicon carbide in medium- to fine-grit outperforms zirconia or ceramic.
- Ignoring belt tracking: A misaligned belt edge wears unevenly and leaves inconsistent scratch patterns on the workpiece. Check tracking before each session.
- Running a worn belt: A belt past its service life generates friction instead of abrasion. If you are pressing harder to get the same result, the belt is done.
Deburring, blending, and finishing can often be handled with a single non-woven product when abrasive steps are planned correctly, reducing changeovers and keeping throughput moving.
How to Maintain a Belt Sander After Use
Steps to maintain your belt sander after use:
- Clear metal dust and debris from the platen, contact wheel, and frame after every session. Inspect the belt for heat cracks at the splice or stiff spots in the backing.
- Check the contact wheel for uneven wear or embedded abrasive particles.
- Verify that belt tracking remains centered and that all guards are secure.
- Follow the manufacturer's maintenance schedule for lubrication intervals and wear part replacement on your specific machine.
Scotchman Industries builds the DBS-3 dual belt sander for exactly this kind of shop work: two independent 3" x 48" belts running at 60 feet per second via a 1.0 HP dual-shaft motor, toolless belt changing, and a heavy-duty stationary frame built for daily fabrication use. It carries a 3-year warranty and is backed by Scotchman's nearly 60 years of manufacturing experience.
To see it in your shop, schedule a demo at scotchman.com/schedule-demo or call 605-859-2542.
FAQs About How to Use a Belt Sander
What is a belt sander used for?
A belt grinder is used for deburring, weld blending, surface conditioning, and preparing metal surfaces for coating or finishing. It handles the cleanup work left by punching, shearing, and welding.
Can you use a belt sander on metal?
Yes. A stationary industrial belt sander is well-suited for fabrication work on both ferrous and non-ferrous metals. The key is selecting the correct abrasive type and grit for the material and application.
What grit should I use with a belt sander?
Start coarse (36–60) for heavy stock removal. Use medium grits (80–120) for deburring and blending. Move to fine grits (150–220) for surface finishing before coating. Match the abrasive grain to the material: zirconia or ceramic for steel, silicon carbide for aluminum and brass.
How do you keep a belt sander from gouging?
Keep the workpiece moving at a consistent pace and use light pressure. Dwelling in one spot and pressing too hard are the two main causes of gouging. Let the abrasive cut, and check the surface frequently during the pass.